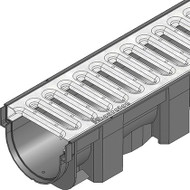
Installing a channel drain system in your home is an easy and cost-effective way to deal with drainage issues on your property. It’s so easy, in fact, that most people can do it themselves. Making sure you install it properly, however, is vital for ensuring effective drainage and preventing water damage.
In this guide, we will take you through a typical channel drain installation process for a domestic driveway, offering additional tips and guidance where needed to give you a good overview from start to finish.
The steps shown will largely be the same for any application, but installations in public, commercial, or industrial areas come with extra risks and liabilities, and so should only be undertaken by professionals.
Before going any further, however, we highly recommend checking out our companion article, “How to plan and prepare for a channel drain installation”, if you haven’t already done so. It includes advice about whether you need planning permission to install a channel drain system, how the installation needs differ between concrete, tarmac, or block paving driveways, and a recommended list of what tools are needed and why. Being properly prepared for the task at hand will make it all go a lot smoother.
For anyone who is just interested in seeing a brief overview of what is involved, we’ll start off with a quick guide. If you want a more thorough explanation of what to do at each stage, skip on down to our step-by-step guide below.
Driveway Channel Drain Installation Quick Guide
Step 1. Mark the area
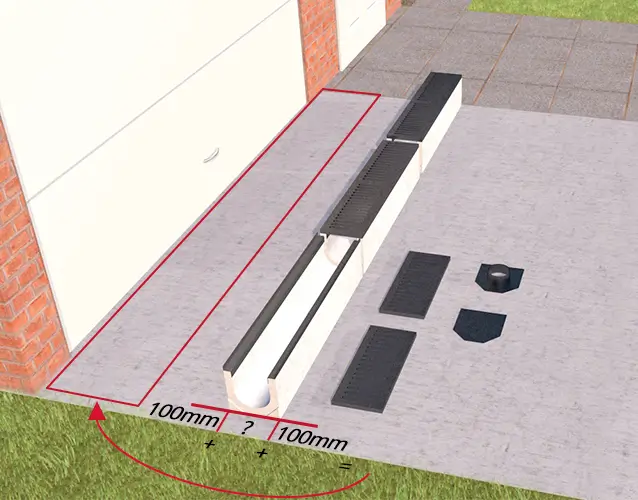
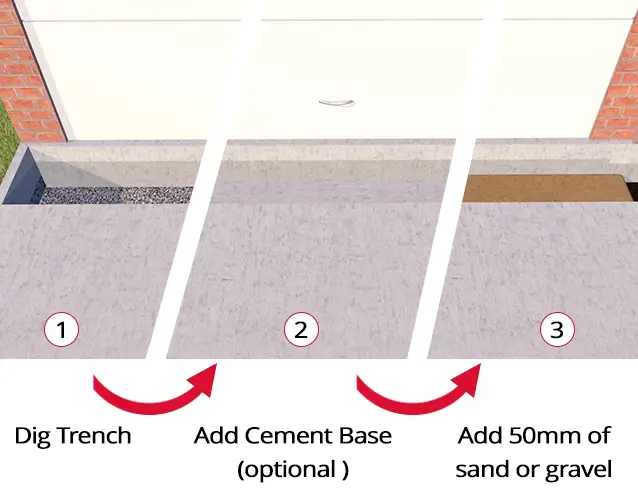
Mark out a trench that is wide enough for your channel drain, plus 100mm of concrete fill on either side.
Step 2. Excavate the Trench
Dig a trench deep enough for your channel drain to sit 2mm below the surface with a 50mm base of gravel or sand beneath it.
Step 3. Base Preparation
Add a 50mm base layer of either sand or gravel and compact it down.
Step 4. Assemble the Channel Drain
Put your channel drain system together to see how well it will fit the trench.
Step 5. Cut the Channel Drain
If a cut is needed, make sure it is made to the end opposite end of the system from where the outlet will be.
Step 6. Install the Channel Drain
Lay the channel drain lengths into the trench, starting with a full length at the lowest point, and connect them up, adjusting the base layer as needed to allow for a fall of 5mm for every 1m length of drain. Add end caps as needed.
Step 7. Outlet Connection
Connect the outlet to a main drain or soakaway, either through the pre-marked sections in the base of the channel drain or via an outlet end cap, using 110mm drainage pipe (we’d recommend our ULTRA3 range of pipes and fittings for this).
Step 8. Test the Drainage
Pour water into the channel drains once everything is connected up to test that it drains away properly.
Step 9. Backfill Around the Channel Drain
Backfill the trenches with suitable materials to hold the channel drain and pipework in place. Cover your gratings with tape beforehand to prevent any backfill material from falling into the drains or damaging the gratings.
Step 10. Finishing Touches
Re-finish your driveway surface and restore the surrounding area. Allow 24-72 hours for any wet materials to cure before removing the grates or using the driveway.
And now for the same steps but in a lot more depth and detail:
Step-by-Step Driveway Channel Drain Installation Guide
Once you have done all the prep, have all the right tools, and have purchased your perfect channel drain system, it’s time to start on the installation.
Please Note: the guide presented below is a very generic one intended to give you an idea of what is involved. Always make sure that you follow the installation guide provided by the manufacturer of your chosen system first and foremost, as their product may require additional steps or considerations not mentioned here.
Step 0. Safety Tips
It goes without saying that any DIY job you undertake should be conducted with a “safety-first” attitude. However, while most of us would don the proper safety gear when on a job site, when it comes to doing projects at home, we can get a bit lackadaisical about it and “forget” to wear any personal protective equipment. For this reason, we feel it important to stress the following safety advice for installing channel drain in your driveway:
- Wear safety glasses – you will likely be dealing with some combination of concrete, metal, and plastic materials, all of which can produce shards and splinters when cut or struck that could easily cause serious damage to your eyes if they aren’t protected.
- Wear protective gloves – the recommended tool list for this job includes saws, mallets, and chisels…please just wear a pair of protective gloves.
- Wear a dust mask - If you are going to be cutting through concrete or tarmac, a dust mask is highly recommended to save your lungs from harmful dust particles.
Step 1. Mark the area
| Recommended Tools | |||||
|---|---|---|---|---|---|
| Tape Measure | String and Stakes | Chalk | |||
Once you’ve selected the most suitable location for your channel drain system, use a measuring tape and mark out the area that will need to be excavated for your channel drain trench. You can either use stakes and string to create a clear outline or draw it onto the surface with something non-permanent like chalk, for example.
The trench will need to be wide enough to accommodate the width of your chosen channel drain and at least 100mm of concrete backfill on each side to hold it firmly in place. Keep this in mind when making your measurements.
Step 2. Excavate the trench

| Recommended Tools | |||||
|---|---|---|---|---|---|
| Concrete Saw* | Paver Lifter/Cold Chisel & Mallet** | Pickaxe | Shovel & Trowel | ||
*If you have a concrete or tarmac driveway
**If you have a block paving driveway
Depending on the type of driveway you have (tarmac, concrete, gravel, block paving, etc.), you will either need to cut, dig, or lift up the area marked for your trench. To reach the right depth, you may need to excavate through a few different material layers, including hardcore and soil, so make sure you have access to all the relevant tools that you might need.
If the bottom of your trench ends up being in soil, it might be worth giving it a concrete base before continuing on with the installation, just to give the channel drain a stable footing that won’t shift as easily over time.
Important things to consider:
Trench Depth
The trench needs to be deep enough to accommodate the depth of your chosen channel drain and at least a 50mm base layer of either compacted sand or gravel. If you need to add a concrete base to the bottom of your trench (if installing on soil, for example), make sure to add the extra depth required to your measurements to ensure you can still accommodate both the channel drain and a 50mm layer of sand or gravel.
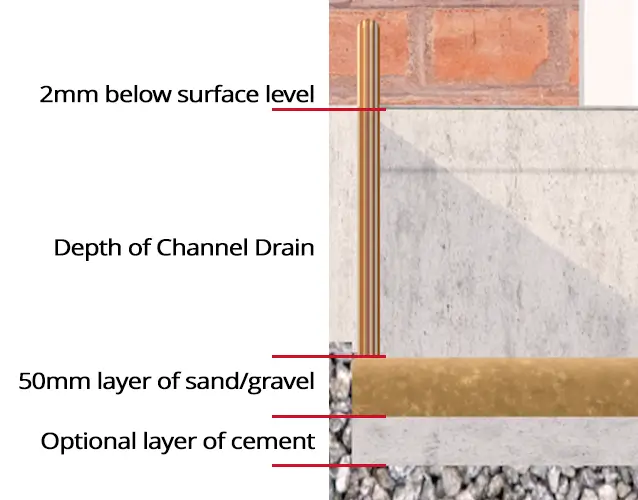
Finishing Height of the Grating
The top of the channel drain grate should sit 2mm below the surface level. Fixing a length of string to run along the trench at this height can help you gauge the depth needed to allow for this.
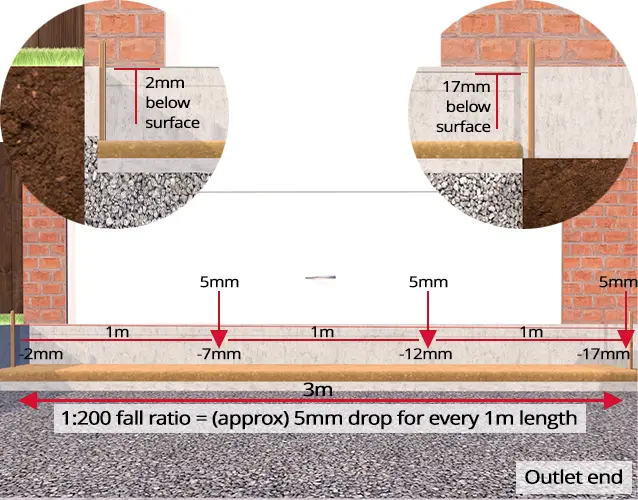
Drainage Fall
Most domestic channels do not have a built-in fall or slope, so this needs to be accommodated for manually in the trench preparation. The recommended fall ratio is 1:200, or approximately 5mm for every 1m length, with the lowest point being at the outlet end.
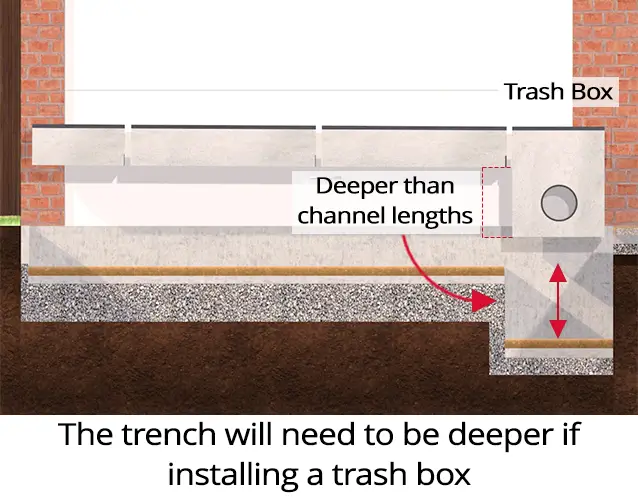
Installing a Trash Box
If you want to install a trash box for extra protection against debris entering the drainage system, you’ll need to plan for this ahead of time as they are usually much deeper than the channel lengths and will, therefore, require a deeper section of the trench to install. A trash box should be installed at the outlet end of the trench, so excavate that section deep enough to accommodate it and the 50mm base layer that will still be required.
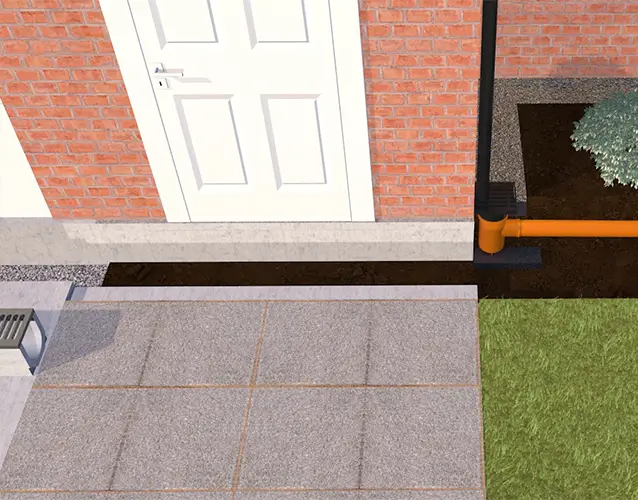
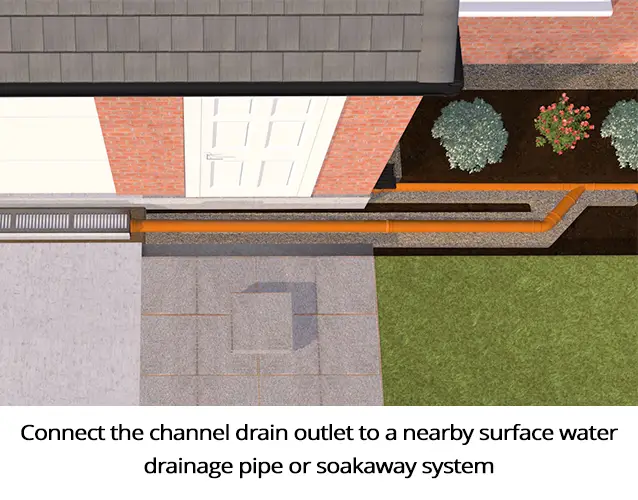
It is important to remember that the required trench is unlikely to end at the edge of your driveway, as you will need to facilitate a connection between the channel drain outlet and an appropriate surface water drain pipe or soakaway system. If you have read our guide to planning a channel drain installation mentioned above, you should have already been able to locate a suitable drain and will, therefore, need to excavate a further trench to allow for the laying and connecting up of the pipework. This will need to have a fall running down from the outlet connection to the discharge point, too, so keep that in mind when digging your trench. Have a read of our guide to installing underground drainage pipe for more advice.
Does the channel drain need to be installed with a slope or a fall?
Contrary to popular belief, not all channel drain installations actually require a slope/fall to drain properly. As long as the outlet pipe is connected to the base of the channel drain rather than to an outlet end cap, and your driveway doesn’t naturally slope away from it, the water collected in the channel will still drain away because it will always run to the lowest point. This can be useful for installations where the finished surface has to run completely flat or where accommodating a fall might be too difficult.
However, the downside to not installing a channel drain system with the recommended fall is that the water won’t drain away as quickly as it otherwise would. This could be a problem if you’re trying to solve a flooding issue and your driveway slopes down to the point where the channel drain will be installed, as it may not be able to channel the water away fast enough to prevent said flooding.
Installing a fall of 5mm for every 1m channel length is therefore recommended wherever possible, as it will help to ensure that the water flows freely through the channel drain and out the outlet in the most efficient way.
Step 3. Base Preparation
| Recommended Tools | |||||
|---|---|---|---|---|---|
| Concrete Mix* | Mixing Bucket* | Tarpaulin* | Sand or Gravel | Compactor | Spirit Level |
*only needed if you want to add a concrete base to the bottom of your trench for stability.
Once the trench has been excavated, you’ll need to add your 50mm layer of either gravel or sand to the entire length of the system and compact it down, ready for the channel drain to sit on. This helps to level out the trench, gives it a stable base, and makes it easier to adjust for a fall if you are adding one. Using a compactor tool and a spirit level can make this process easier.
Important things to consider:
- Adding a Concrete Base - If you first need to add a concrete base to the bottom of the trench, you’ll need to let it set before adding the sand or gravel.
- Adding a Drainage Fall - If adding a fall, start with the level base and then wait until Step 6 before making any adjustments. It’s easier to measure for the fall when the channel drain is sitting in the trench, as you can more easily compare it to your height string.
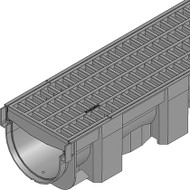
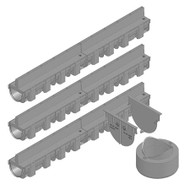
Step 4. Assemble the Channel Drain
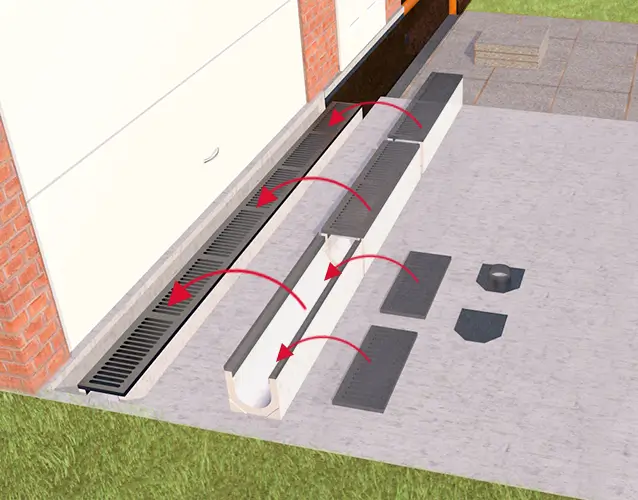
With the trench prepped and ready, it’s time to put your channel drain system together to see how it will fit. Following the manufacturer’s instructions for your chosen channel drain, connect your lengths together on the surface running parallel to the trench. This will help you visualise the layout and decide if any adjustments need to be made.
Important things to consider:
- Check for Problems - Putting the system together now also allows you to check that you have all the right pieces and that they all fit together as expected.
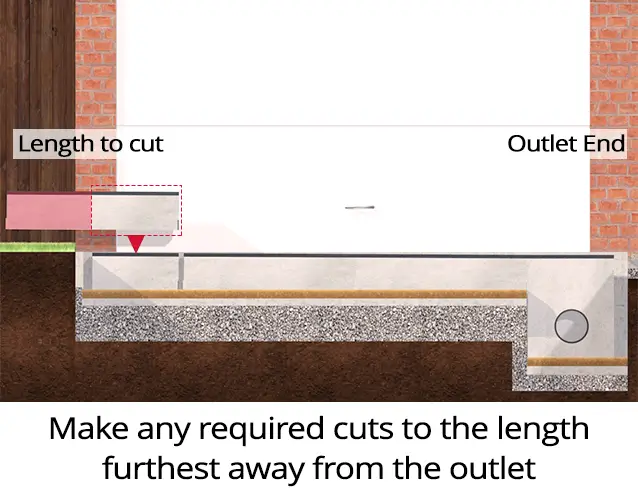
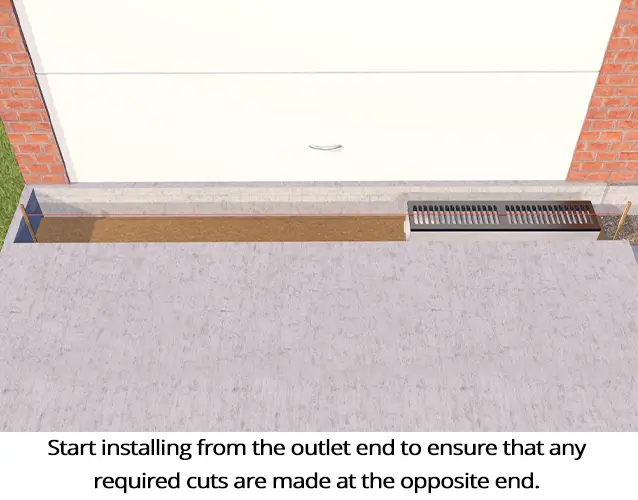
- Start at the Outlet - When putting the system together, start laying the channel lengths at the lowest end of the trench to ensure that any cuts needed to make it fit will be at the furthest point from where the outlet is.
- Measure the Cut - If a cut is needed, measure and mark it up properly before moving on to the next step.
- Installing a Trash Box – if a trash box is part of your planned system, it should ideally be used to connect to the outlet and, therefore, should be placed before the channel lengths.
Step 5. Cut the Channel Drain
| Recommended Tools | |||||
|---|---|---|---|---|---|
| Angle Grinder* | Hacksaw** | ||||
*for cutting through concrete or metal channel drain materials
**for cutting through plastic channel drain materials
Unless your trench measurement is exactly 3m or 4m, etc., it is highly likely that you will need to cut your channel drain system down to size to make it fit properly. Use a hacksaw or angle grinder (depending on what material your channel drain is made of) to cut one of your, typically, 1m long channel lengths down the appropriate size. Follow the manufacturer's guidelines for cutting.
If the drainage pipe you will be connecting your channel drain to is below your channel drain trench, now would also be a good time to cut out the outlet hole in the appropriate channel length or trash box, if needed. This should be fairly straightforward in most cases, but always follow the manufacturer’s guidance to be safe.
Important things to consider:
- Follow the Guidelines - Always follow the manufacturer's guidelines for cutting, as there may be specific recommendations or requirements specifically for the channel drain you have chosen that will not be mentioned in any generic installation guide.
- Don’t Cut the Outlet End - Make sure that the length you cut is from the opposite end of the system to where the outlet is. Making a cut to the outlet length of channel drain can cause problems during the installation and, therefore, is not recommended at all.
- Make a Clean Cut - Try to keep your cut as straight and clean as possible, as this will make installing the end cap easier.
Step 6. Install the Channel Drain
| Recommended Tools | |||||
|---|---|---|---|---|---|
| Screwdriver* | Hex Key** | Silicone Sealant | |||
*if the grating is fitted with screws
**if the grating is fitted with a locking mechanism
It’s finally time to begin the installation. If the grates aren’t already in place, fit them now, as this will be needed to get the proper level. Some grates snap into place, while others may require screws or locking mechanisms, so make sure you have the right tools ready for your system. Once this is done, you then need to:
Lay the Drain
If you are using plastic channel drains for your system, and as long as it isn’t over 3 or 4m in total length, you should be able to lower it down into the trench while the lengths are still connected together. If you’ve chosen a heavier material for your channel drains, however, you’ll want to disassemble the system and then reassemble it down in the trench, making sure that you once again start with a full length where the outlet will be.
Level the Drain
Use a spirit level and the 2mm recess marker string you set up to get the system properly aligned and set in place. This process may require adding or removing some of your base material, so keep a trowel handy.
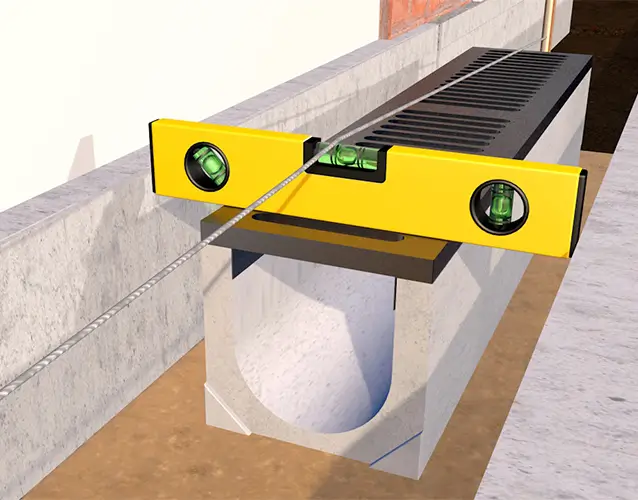
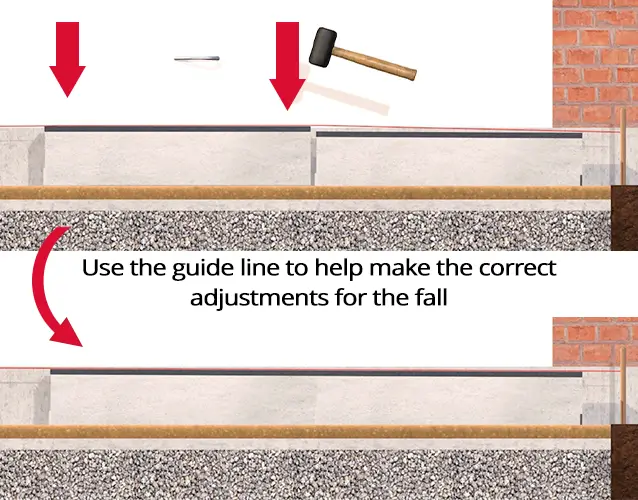
Add a Fall
This is the point at which you’ll need to make adjustments for the fall if you plan to have one. If you start with the connected system perfectly level with your recess marker string, this process can be as simple as calculating a 5mm drop for every 1m length you have (round up or down if your cut length is over or under half a meter) and then using a tape measure and a mallet to gently tap the outlet end of the system down to the required height. If you are piecing the lengths together as you go, you may find it easier to adjust for the fall one length at a time.
Once finished, install an end cap at the highest point and seal the joints along the system with a silicone sealant to ensure it is watertight. At the lowest end of the system, where the outlet connection needs to be made, you need to either add another end cap if the drain pipe you plan to connect to is below the channel or an outlet end cap if the drain pipe is adjacent to it.

How do you install channel drain around a corner?
If you plan to install your channel drain around the perimeter of your property rather than just across your driveway, you’ll need to know how to take a linear drain around a corner or two. To do this, you will simply need a channel drain system that has corner sections or junctions available. They will typically connect up as easily as the channel drain lengths do to each other, so the installation of them shouldn’t cause any added complications.
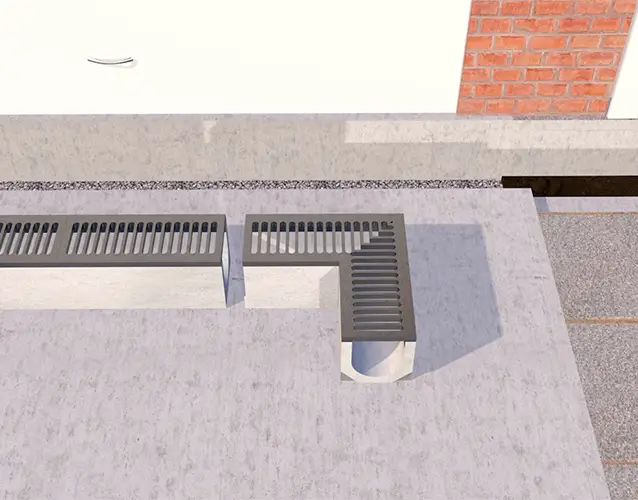
Installing channel drain in this fashion isn’t all that common for domestic properties, however, and can be a bit more tricky to plan for as you will probably need to accommodate multiple outlet connections to ensure the water drains away properly all the way around. For this reason, we’d recommend hiring a professional to undertake a project like this.
Step 7. Outlet Connection
| Recommended Tools | |||||
|---|---|---|---|---|---|
| Knife/Hammer* | Drill** | ULTRA3 Pipework | Pipe solvent | ||
*for making outlet holes in plastic channel drains
**for making holes in concrete channel drains
Efficiently channelling rainwater away from your premises requires a seamless integration of the channel drainage with some kind of drainage system – be it the main surface water drains or a soakaway in your garden. Two primary methods exist for connecting channel drains to PVC pipes:
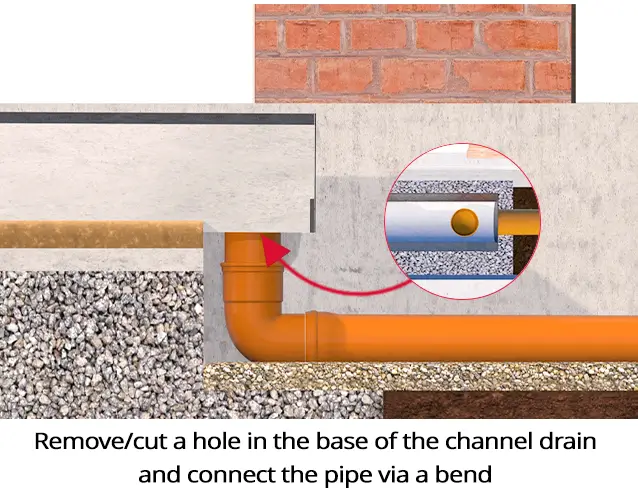
Method 1: Bottom Outlet Integration
If the connecting drain pipe lies at a lower elevation than the channel drain, it is best to make use of the pre-marked bottom outlets on the channel length at the outlet end of the system. Simply remove the most suitable outlet section (follow the manufacturer’s recommendations on how best to do this), and firmly insert a 110mm drainage pipe or the end of a single socket bend directly into the outlet. For added peace of mind and a permanent seal, you can apply solvent weld to the joint, but it will be held firmly in place once you fill in the trench with concrete in step 9 either way.
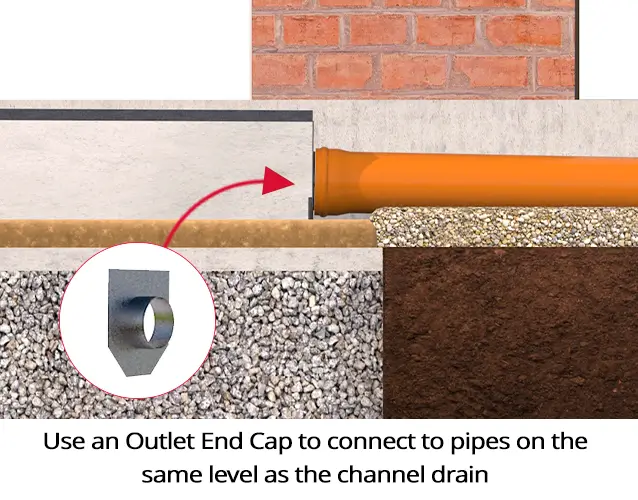
Method 2: Outlet End Cap Connection
When the main surface water drainage system or soakaway pipework is level with the end of the channel drain installation, an outlet end cap is a better option. It fits onto the channel drain in the same way as a normal end cap, but it has an opening that allows a length of drainage pipe (usually 110mm for a domestic installation) or the end of a single socket bend to be directly connected. No solvent weld is necessary for this joint, as it will be securely sealed within the surrounding concrete.
By employing either of these two methods, a seamless connection between the channel drain and drainage pipework can be achieved, ensuring effective surface water management and a well-functioning drainage system.
Once you've decided which method is most suitable, connecting the channel drain outlet is relatively straightforward. Simply use an appropriate assortment of pipe lengths, bends, and connectors (we’d recommend using our ULTRA3 range) to join it up with the surface water drainage pipe. Make sure there is enough of a fall in the pipework to facilitate efficient drainage, and check all the connections are watertight before moving on.
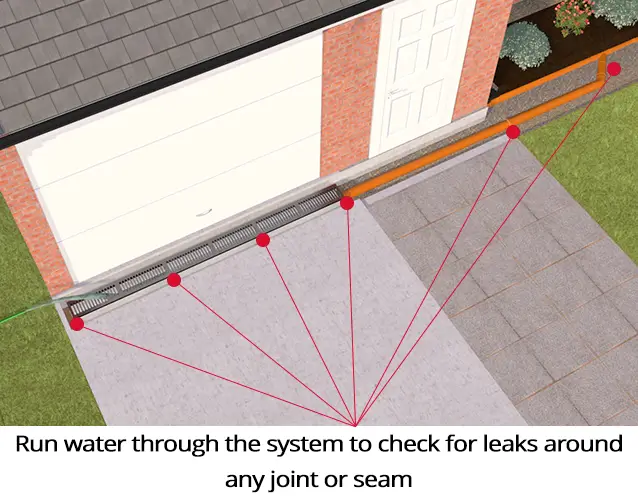
Step 8. Test the Drainage
| Recommended Tools | |||||
|---|---|---|---|---|---|
| Bucket/Hose Pipe | Water | ||||
With your system connected up and your trenches still open, now is a good time to test how well it drains and check for any leaks…it’s a lot easier to fix any problems at this stage than once everything is covered back up.
Pour water into the channel drain, either by the bucket full or continuous flow with a hose and observe how well it flows out of the channel. Check along the pipeline to the surface water drain for any leaks. If the drainage is too slow, try adjusting the fall down towards the outlet. If there are any leaks, check the seal on your pipe connections.
Once you are satisfied that the system is draining efficiently with no leaks, it’s time to make your driveway channel drainage a permanent fixture.
Step 9. Backfill Around the Channel Drain
| Recommended Tools | |||||
|---|---|---|---|---|---|
| Concrete Mix | Formwork Planks | Trowel & Edger | Tamper | Sealant | Gravel, Sand, or Soil* |
*if other layers of backfill are required
Depending on the type of driveway you have and how wide you dug your trench, you may decide to use concrete, gravel, soil, or a mixture of all for your backfill. In most cases, however, it is recommended that at least 100mm on either side of the channel drain is filled in with concrete, as this is the best way to ensure that it is properly secured in place. If the channel drain is not properly secured, it could move over time and cause drainage problems. For this reason, we will continue this guide with details about using a concrete backfill. Most of the steps should be relatively transferable, however, if you plan to go concrete-free.
Important things to consider:
- If the driveway doesn’t have a concrete finish, you’ll either need to accept a concrete border around your drain or leave enough space to add a suitable amount of your chosen surface layer on top.
- If your trench is wider than the recommended 100mm on either side of the drainage channel, you can use a formwork mould (typically made from wood or plastic planks) to segment the trench and allow you to more easily pour the desired amount of concrete in.
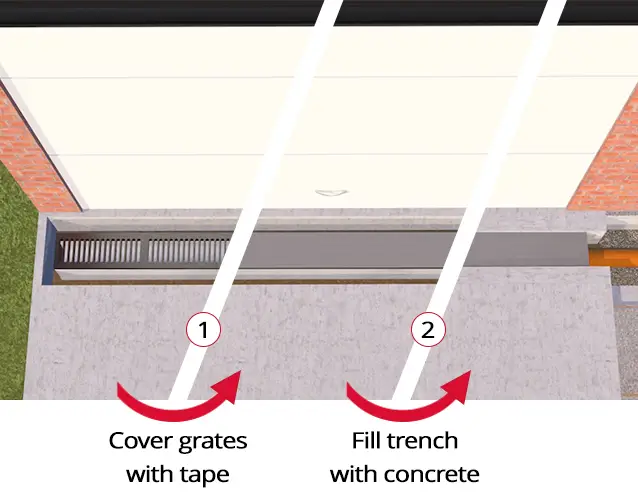
- Before getting to the pouring stage, make sure that you have your channel drain gratings in place and securely covered with tape or something similar. This will keep both the channel and the grating safe from concrete spills and splashes while still allowing you to see the finished height of the system.
Once you are ready to add your concrete backfill, you’ll need to:
- Pour the Concrete - Pour the concrete into the trench, making sure it completely fills the gaps around the channel drain to the desired level on both sides.
- Remove Air Bubbles – Using either a tamper tool or a rubber mallet, tap the concrete down to remove any air bubbles.
- Re-level the Channel Drain – It’s possible that the drainage channels could shift a bit as the concrete is poured in. Check the height and the fall are still correct and that the width across the trench is level. If any adjustments are needed, use a rubber mallet to tap the channel drain lengths back into position.
- Level the concrete (if you have a concrete driveway) – Make sure that the backfill finishes level with the surface material. To do this, you can either smooth it up from the grating to the surface level (which should be 2mm higher) or build a formwork boxing over the gratings to give you a removable wall to level against.
- Let the Concrete Cure - Allow the concrete to cure for at least 24-72 hours before removing the formwork around the concrete (if used – check the recommended curing time for the specific mix you use and follow that if different).
- Seal the Gaps - Seal any gaps between the channel drain and concrete with sealant to prevent water from seeping into the driveway.
If you are backfilling with anything other than concrete or are adding another backfill material around the concrete, such as gravel, sand, or soil, make sure that you still compact it down to prevent it from settling.
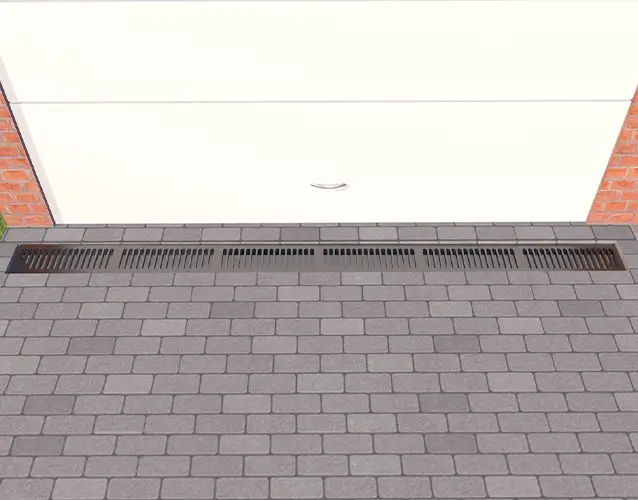
If your driveway has a concrete finish, your trench should now be filled back level with the surface layer, the tape can be removed from the gratings, and you can call the job done. If you have another type of surface layer, however, you’ll need to replace that next.
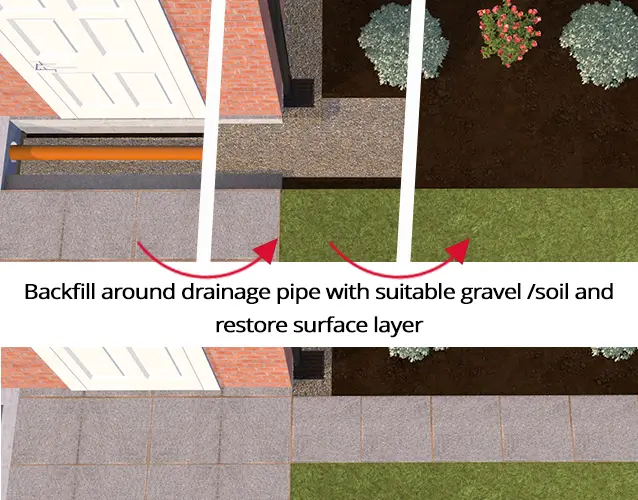
Step 9.5. Backfill Around the Drainage Pipe
Fill in the trench dug for your drainage pipe, that connects the channel drain to the surface water drain, with gravel and/or soil and restore the surrounding area to its original condition. Compact the backfill again to ensure it firmly holds the pipework. Don’t use concrete for this stage.
If your driveway has a concrete finish, your trench should now be filled back level with the surface layer, the tape can be removed from the gratings, and you can call the job done. If you have another type of surface layer, however, you’ll need to replace that next.
Step 10. Finishing Touches

Once you’ve added your backfill and allowed it enough time to set (in the case of concrete), you’ll then be able to restore the driveway back to normal by relaying the surface layer – be it block paving or tarmac.
Restoring a block paving driveway after installing channel drain
If you have a block paving driveway, you’ll need to refinish it by matching the subbase layer (typically crushed rock or gravel) and the sand screed bedding layer with the surrounding paving before relaying the blocks, some of which will need cutting to size. You’ll then need to joint the re-laid bricks with fine sharp sand and compact it down. Allow the re-laid section to cure for a few days before then applying a sealant to finish it off.
Restoring a tarmac driveway after installing channel drain
If you have a tarmac driveway, you’ll again need to match any base layer of hardcore, etc., before pouring a tarmac mix over the top. Make sure you get an even layer and smooth it out to remove any air bubbles. Once it has begun to cool and harden, sprinkle fine sand over it to fill in any minor imperfections and brush it into the surface. Use a compactor to properly finish it off and then allow it to fully set before walking or driving over it. Make sure you follow the instructions on the tarmac mix for more thorough advice.
Once you are finished laying, compacting, and sealing your surface layer around the channel drain, remove the tape covering the grating and re-test the drainage to ensure everything is still working correctly.
Additional tips:
- Always refer to the manufacturer's instructions and guidelines specific to your channel drain kit for the most accurate installation steps.
- Use a good quality concrete mix to ensure that the channel drain is durable.
- If you are installing the channel drain in a cold climate, be sure to use a frost-resistant sealant.
- Be careful not to overfill the trench with your backfill material.
- Allow the concrete to cure completely before walking on it or relaying any other surface layer materials on top.

And that’s it! Congratulations! You've successfully installed a channel drain system in your driveway. With proper planning and installation, a channel drain can be a long-lasting and effective way to collect and remove surface water. Regular maintenance, such as cleaning out debris from the grates, will help maintain its effectiveness over time. For further advice on how to properly maintain your channel drain system, check out our channel drain maintenance guide.
If you have any questions or need further advice about your channel drainage installation, contact JDP today. Our team of experts are always on hand to help with all of your civils and drainage needs.