A septic drainage field (or foul water soakaway system) enables effluent discharge from septic tanks and sewage treatment plants to be dispersed through the ground and consists of a series of perforated pipes laid in an arrangement of trenches situated beneath a soft landscaped area (i.e. a lawn). The system allows contaminants and impurities to be filtered out by the soil. The effectiveness of this process, however, is entirely dependent on the type of soil that the effluent is being discharged into.
It's important assess the suitability of your soil before starting your installation, as the absorption rate of the ground will help you determine the size of the drainage field required, or if you can even install one at all. That is where the percolation test comes in.
Note: This guide is intended for the planning of foul water soakaways/drainage fields. Surface water soakaway crate systems must handle a larger volume of water in a shorter period of time, meaning that, while the test itself may be the same, the calculations of suitability may differ from those in this guide. Please check with your local authority or contact JDP for further advice.
What is a percolation test?
A percolation test (or "perc test") determines the rate of water absorption into the ground. The procedure measures how long it takes a measured amount of water to drain away from a saturated hole dug into the ground; the result determines the suitability (and permeability) of the soil, and ensures that the ground has sufficient drainage capacity to handle the amount of water that will come from the drainage field you intend to install.
Why do I need a percolation test?
It makes sure that the soakaway is going to work properly and isn't going to pollute the environment.
A percolation test doesn't just test the suitability and permeability of the soil for your soakaway, but also checks that the drainage field will allow discharge to soak into the soil, without pooling or saturating the ground, at a rate that fully removes contaminants before it reaches the water table.
When is a percolation test needed?
A percolation test should always be performed BEFORE installing a new soakaway system, or when replacing an existing one (which is usually sited in a different location to the existing soakaway). If you are installing a new septic tank or sewage treatment plant, and are depending upon a drainage field to be your discharge option, then you must perform this test.
Before you perform a percolation test
In England a percolation test should only be performed after the completion of a Groundwater Source Protection Zone search and a Trial Site Assessment Hole to establish protected groundwater supplies and the localised groundwater table. These are necessary to ensure that the installation of your drainage field will not risk contaminating any groundwater sources (which supply drinking water in some parts of England) or be at risk of failure due to changes in the water table level. Failure to comply with either will mean you can't install a drainage field at all and a percolation test would be a waste of time.
You may fail to get planning permission for your sewage system if these tests are not completed. Requirements in Scotland, Wales and Northern Ireland may differ so please check with the national environment authority for further advice.
Soil types for a percolation test
If the soil in the proposed area of the soakaway is found to be too dense then the discharge won’t be able to drain through it quick enough to prevent pooling or flooding from occurring. Alternatively, if the soil is too porous, then the discharge will drain away too quickly, which could prevent it from being treated properly. Either of these outcomes could prevent you from being able to install a drainage field altogether and, in extreme cases, even prevent the installation of a septic tank or sewage treatment plant.
In general, the best soil types for a drainage field soakaway are:
- Sandy soils
- Chalky soils
- Loamy soils (soil with a mixture of particle sizes)
The least suitable soil types for a drainage field soakaway are:
- Clay soils (including soil with high clay content)
- Silty soils
If the percolation test results determine that the soil is in the "Goldilocks zone" of drainage - not to slow to drain discharge but not too quick to not treat it - the results will help with calculating the size of the soakaway field you'll need.
Where to perform a percolation test
Percolation tests should be performed on the site where you want to install a drainage field, with at least two separate test holes.
Foul water drainage field systems need to be a minimum of 10 metres away from any watercourse, 15 metres away from any building, and 50 metres from any water supply. For example, if your garden is 50m2, and the percolation test results show your drainage field would also need to be 50m2, you would be unable to install it due to these minimum distance requirements. This is why the percolation test should be conducted during the early stages of your planning permission journey.
You also can't install a soakaway too close to other areas. Check our drainage field soakaway installation guide for other installation restrictions.
How to perform a percolation test
The test itself is fairly simple; dig a hole of a certain size where you're drainage field is going to be, fill it with water, and see how long it takes for the water to disappear. To get the most accurate results, and do the test right, there's a bit more devil in the detail.
The following steps should be performed in two separate locations.
Preparation
Determine where the tank will be situated, and where the outlet pipe is likely to be, and where your drainage field is likely to start. You will need:
- A shovel
- A tape measure (or ruler to measure at least 300mm)
- A way to measure time in seconds (such as a stopwatch or timer)
- A notepad and pen, or something to record the results on
- A bucket or hosepipe to put water into the dug hole
Step 1: Dig the hole
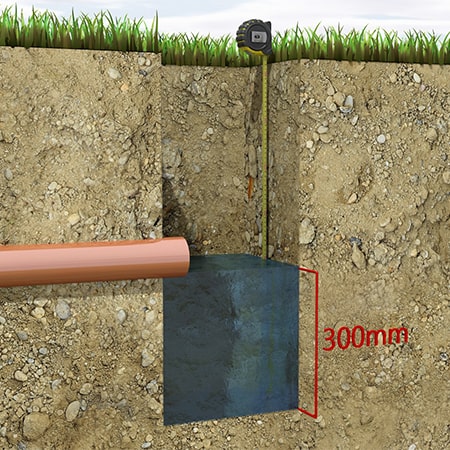
Mark out a test hole that is 300mm x 300mm wide and at least 300mm deep below the proposed invert level of the outlet pipe.
The test hole must be below the invert level. Where the invert level is quite deep you may need to excavate a larger area to safely reach the outlet pipe depth. Please refer to Building Regulations Part H2 1.34 or contact JDP for further advice.
Step 2: Saturate the soil
Clear the hole of any loose debris (including stones or lumps of soil). Use your measuring tape or ruler to mark out a depth of 300mm inside the test hole, and fill the hole up to this 300mm depth mark. Allow this water to seep away overnight.
Note: if you already think your soil might be too porous or too dense, and don’t want to wait overnight, the following guidelines should give you a faster answer. If the water drains away too quickly, refill it several times and monitor the rate at which it soaks away. If it is continuously draining away within 10 – 20 minutes, then your soil is unsuitable for a drainage field, as is too porous. Alternatively, if you find that the water hasn’t drained away within 6 – 12 hours, that means your soil is too dense and therefore also unsuitable. In either event, the test has failed, and it will be unnecessary to continue on with any further steps.
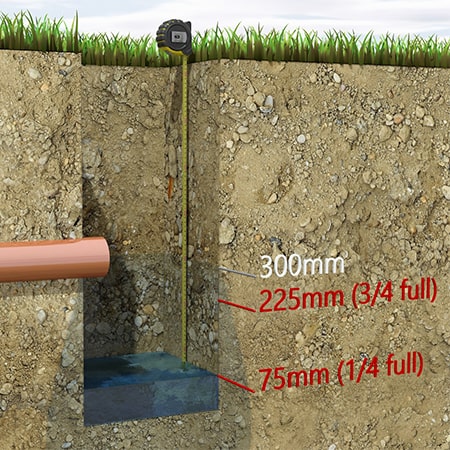
Step 3: Determine the percolation rate
- The next day, refill the test hole with water up to a depth of 300mm, and observe how quickly the water seeps away.
- When the water level drops to 225mm (¾ full) — start timing, in seconds, how long it takes the water level to reach 75mm (¼ full). This gives you the time it took the water level to drop 150mm.
- Divide this number by 150 to determine the average time it takes the water level to drop 1mm — this is called the Vp number.
- For example, if it takes 1 hour for the water level to drop 150mm the calculation would be:
60 minutes x 60 = 3,600 seconds3,600 ÷ 150 = 24Vp = 24 seconds
Step 4: Repeat the test
Steps 1-3 should be carried out at least three times per test hole, preferably at different times of the day. The average Vp number across all tests performed should then be taken as the Percolation Rate of your soil.
If the Vp values vary widely between your tests, you should consider performing the test a further three times in different locations. This will help your average figure to be as accurate as possible.
Interpreting the results of a percolation test
If your average Vp number is between 15 and 100 grab the confetti — you can have a soakaway field!
A minimum value of 15 ensures that the soil's percolation rate is slow enough to allow the effluent to be sufficiently treated before reaching the ground water. Any value lower than 15 would mean that the untreated effluent could drain away too rapidly and pollute the groundwater.
A maximum value of 100 ensures that the soil's percolation rate is quick enough to allow the effluent to disperse into the ground and avoid the system failing/backing up. Any value higher than 100 would mean that the untreated effluent would not soakaway fast enough for the system to be effective.
Armed with this information, and assuming your tests have been a success, you can now go on to determine the most suitable size of drainage field for your foul water system — advance to our Sizing a Septic Drainage Field advice. If you are unsure about your results, or have any other questions about foul water drainage fields, it is always worth seeking expert advice. Here at JDP we have a Technical Support team who are always ready to offer free and impartial advice about all your drainage needs; contact them today to see how they could help you!
How-to video
Have a watch our How To Perform A Percolation Test