Installing a new guttering system can be a fairly straightforward DIY job, but making sure you have the right guttering to install can be trickier. The thought of climbing a set of ladders to measure your roof, determine the pitch (angle of the slope), and estimate the amount of rainfall the guttering will have to cope with can be a daunting prospect. Fortunately, there are a couple of different methods by which this can be achieved: the easy, the safe, and the accurate.
Under or oversizing the guttering needed for your property is something you really do want to avoid. If you install gutters that are too small for your roof, there is a greater chance of them clogging up more quickly, requiring more frequent cleaning, overflowing in heavy downpours, or even failing to catch the rainwater run-off altogether if they are too narrow.
If, however, you employ a "bigger is better" and "better safe than sorry" attitude, you will potentially avoid these performance issues, but there are some caveats. For a start, oversized guttering can look really unsightly and spoil the look of your home. It will also be more expensive and, therefore, cost you more money than you really needed to spend. So what should you do? How should you go about selecting the right guttering for your house? Well, let’s take a look at your options.
What type of roof do you have?
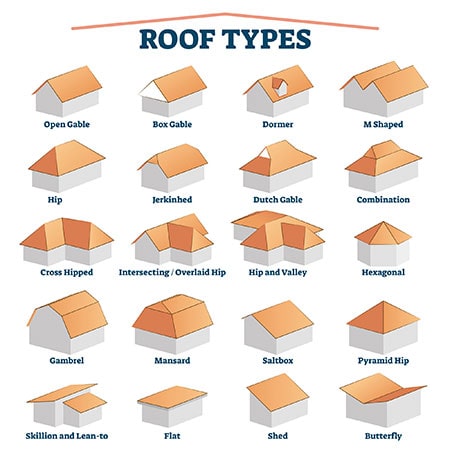
Before we get started on the measurement methods, we need to quickly discuss the issue of what type of roof you have. There are many different styles of roofs out there (as can be seen in the image opposite), and some of them can be very difficult to properly measure up. The most common styles, though, are either Gable or Hip roofs, and, as such, those will be the ones we focus on in this article.
If you have a more complex roof style or shape, you can still use the methods we will be discussing, but you’ll need to draw up a plan of your roof and make sure to measure all the different roof surfaces separately. It can be done, but we’d strongly recommend calling in a professional to help you if you are in any way unsure how to get accurate measurements.
If you have one of the easier roof styles, or are happy to have a go at measuring it yourself anyway, we can move on to the best methods for measuring up your guttering needs.
How to measure your roof - three ways to gauge how much guttering you need
Getting the sizing to be as accurate as possible is the best solution all-round. To achieve this, there are three methods you can try. There’s the easy (no complicated calculations involved), the safe (no climbing up ladders), and the accurate (ladders and calculations needed).
There is no doubt that the Accurate method is the best one, and our personal recommendation if you want to make sure the job gets done correctly. However, the other two methods, which we shall look at first, can still give you a good idea of what you need if done right.
What you will need
- Tape measure
- Spirit level - ideally 61cm (2ft) long, but a 31cm (1ft) one will do
- Chalk
- Pen and paper
- Sturdy ladder (for reaching the roof in methods 1 & 3)
Measure your existing gutters
If you are replacing existing gutters, you already have the perfect template for what you need from your new system attached to your house. Assuming you are replacing the existing system simply because it has reached the end of its lifespan, or because you want to change the look and style of it, and not because it has never done its job properly, it’s probably safe to simply do a like-for-like swap.
If you know the existing system was originally installed correctly and/or you’ve had years of care-free, leak-free cohabitation with your guttering, you can most likely get away with measuring what’s already there and using that information to size the new system. Here’s how to do it:
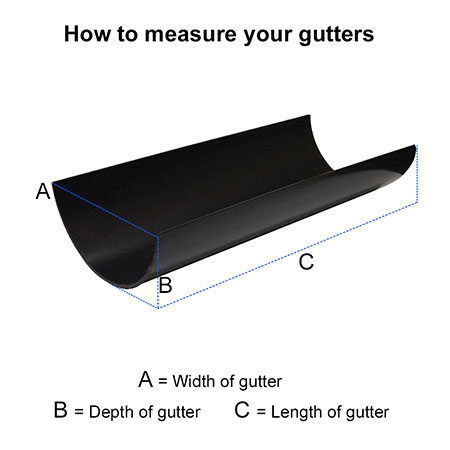
Making sure to safely and securely place your ladders against your house, carefully climb up and measure the width of the opening at the top of your gutter. This will give you the nominal size of the gutter regardless of the shape.
Given that domestic gutters in the UK typically come in 112mm half-round, 114mm square, or 115mm deep flow and Ogee/K-style profiles, you could take a gamble on what the width of your existing gutters is by identifying the type of profile - check out our what are the different types of guttering article for help with this.
However, guttering can come in a variety of other sizes (from 75mm mini gutters to 200mm industrial gutters), so it really is worth getting up your ladders and double-checking yourself.
You need to measure every stretch (or run) of gutters around your house, from corner to corner, to get the total length of new guttering you will need. Remembering to work safely on your ladders, a good technique is as follows:
- Work out how far your tape measure can reach before becoming too unwieldy to control.
- Position your ladders within that distance from one corner of the gutter.
- Safely climb up the ladder to the required height.
- Run the tape measure out to the corner.
- Make a mark on the gutter in chalk to record the measurement.
- Carefully climb back down the ladder.
- Reposition it to a safe distance from the chalk mark.
- Repeat the process until you reach the opposite corner.
- Add up all the measurements taken to calculate the length of that run.
- Repeat for all gutter runs around the property.
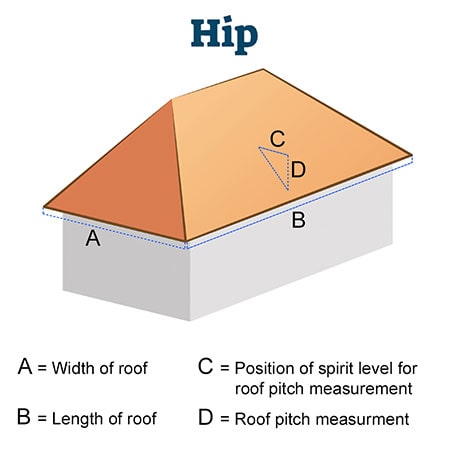
If you have a gable roof that is sloped on two sides of the property, you can probably get away with measuring just one of the runs and multiplying it by two. If you have a hip roof which slopes down to the walls on all sides of the property, however, you will need to measure each run separately and add the lengths together.
Most guttering typically comes in 2m or 4m lengths, which should make it fairly easy to calculate how many lengths you will need from your measurements.
Since gutters alone don't make a guttering system, you’ll need to measure up each of your downpipes as well (assuming you want/need to replace everything). Measure each downspout from where it connects to the gutter down to the ground, utilising the chalk technique again if required. Some of this length will be taken up by connection pieces, but it’s better to have a bit of spare downpipe to work with.
Your existing guttering system will be made up of various ancillary pieces used for connecting everything together and making sure the rainwater that enters the gutter only goes where you want it to go. All of these pieces need to be counted up and added to your new system shopping list, as it will likely require all the same parts. Our basic guide to guttering offers a detailed breakdown of a typical guttering system that can help you identify all the different pieces if needed.
Note: If you have, or intend to have, Ogee/K-Style gutters, the stopends for this profile type come in left and right-hand versions due to its asymmetrical shape. Make sure you account for enough of each type needed.
Having completed steps 1 to 4, you should now have all the measurements needed to buy your replacement gutter system. Check out our guide on how to install guttering if you intend to do the job yourself as it also features instructions on how to safely remove your existing gutters too.
The downside to this method is that you are forced to rely on the existing guttering being right for your property, which may not be the case if it was installed by previous owners. It also isn’t great if you aren’t all that keen on being up a ladder - though this would suggest that you probably aren’t planning on doing the installation yourself, which means you might be better off hiring a professional tradesman to do the measuring up as well as the installation.
If you are intent on at least measuring up the job yourself, the best option is to properly calculate the area of your roof. Ideally, to get the most accurate measurements, you would still need to go up a ladder, as is explained in Method 3. However, Method 2 offers an easier, safer way to do this for those afraid of heights.
Measure your roof area from the ground
Measuring the size of your roof from the ground is always going to be a less accurate method, but it can work well enough for sizing up the guttering you need as long as you do it right and round up any estimated figures just to be safe. Here’s how to do it:
Grab your tape measure and go around the perimeter of your property, measuring every wall. If you have a nice, simple, square or rectangular property, you can get away with just measuring the horizontal length and width. If your property is a more complicated shape, it’s worth drawing yourself a basic diagram and noting down the measurements for each wall - you’ll see why in Step 3.
Be sure to make allowances in your measurements if your roof has an overhang. Your best guess will have to do here - short of waiting for the sun to be directly over your house on a nice day and measuring the shadow cast by the roof, that is.
The measurements taken in Step 1 will give you the flat surface area of your property. However, since most roofs are not flat, you also need to measure the roof height in order to calculate the effective roof area. This, however, is difficult to do from the ground without just taking a rough guess. The standard height of a house roof is around 3 to 3.6m (roughly 10 to 12ft). So, if you have a fairly standard-looking roof, you’d probably be safe taking an educated guess at it being there or thereabouts.
If you want your measurements to be a bit more accurate than this, though, there is another way to calculate the roof area, and that is by working out the pitch. The pitch is the incline (angle) of your roof and can be worked out quite easily. All you need is a spirit level (that is at least 31cm/12inch long - though a 61cm/24inch one would be best), a tape measure and access to your loft.
Note: For the sake of making the future calculation easier, the following measurements are best taken in inches.
How to measure the pitch of your roof
- After climbing up into your loft, being extra careful where you place your feet if it hasn’t been boarded, place one end of your spirit level up against the slope of your roof and find the level point.
- Using your tape measure, take a measurement from the 12-inch mark out from the roof up to the inside of the roof. That measurement will give you the pitch, which is noted as being x/12.
For example, if it were 9 inches from the 12-inch mark on the spirit level up to the roof, your roof pitch would be 9/12. We then need to turn this into a multiplier for our calculations. Thankfully, the hard work there has already been done for us in this handy conversion table.
| Pitch | Angle (degrees) | Multiplier | Pitch | Angle (degrees) | Multiplier |
|---|---|---|---|---|---|
| 1/12 | 4.8 | 1.003 | 10/12 | 39.8 | 1.302 |
| 2/12 | 9.5 | 1.014 | 11/12 | 42.5 | 1.357 |
| 3/12 | 14 | 1.031 | 12/12 | 45 | 1.414 |
| 4/12 | 18.4 | 1.054 | 13/12 | 47.3 | 1.474 |
| 5/12 | 22.6 | 1.083 | 14/12 | 49.4 | 1.537 |
| 6/12 | 26.6 | 1.118 | 15/12 | 51.3 | 1.601 |
| 7/12 | 30.3 | 1.158 | 16/12 | 53.1 | 1.667 |
| 8/12 | 33.7 | 1.202 | 17/12 | 54.8 | 1.734 |
| 9/12 | 36.9 | 1.250 | 18/12 | 56.3 | 1.803 |
Note: If the pitch of your roof is greater than 18/12 we would recommend contacting us for help with your calculations as your guttering may need special consideration.
Unless you want to revisit the trauma caused by high school trigonometry... don’t ask us how the pitch is calculated into an angle. Just be content in the knowledge that our researcher suffered so you don’t have to, and that these are the figures you will need for the purpose of working out the correct gutter size for your house. (If you really want to know how it’s done though, check out our guttering FAQ article for the answer to "How do you calculate the angle of your roof?")
Once armed with your roof height or your pitch multiplier, we can move on to the calculations in Step 3.
Use one of the following calculations, depending on which measurements you took, to arrive at a decent guesstimation of the effective roof area of your property.
If you know the height of your roof, use the following calculation:
Calculation
Calculate the property’s Length x (Half Width + (Roof Height / 2)) = Effective Roof Area (approx.)
Calculation Example
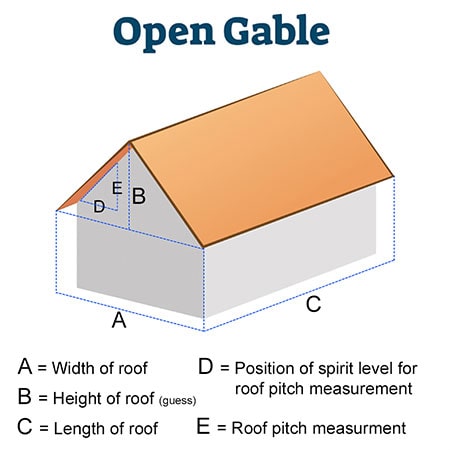
If we take the average size of a house in the UK of 76m2 (and make it a simple square for the sake of this example), along with an average roof height of 3m for a typical gable roof, our calculation would look like this:
- Roof length (the longest edge) = 8.7m
- Half Roof Width = 4.35m (8.7/2)
- Roof Height = 1.5 (3/2)
- 8.7m x (4.35m + 1.5m) = 50.9m2 effective roof area
Calculation Notes
The reason why we divide the roof height by two is to take into account the effect of wind-driven rain. The BS EN 12056-3:2000 standard bases this on the assumption that rain falls at an angle of 2 units vertical to 1 unit horizontal. This means that to calculate the effective catchment area of any surface, you need to halve the vertical height.
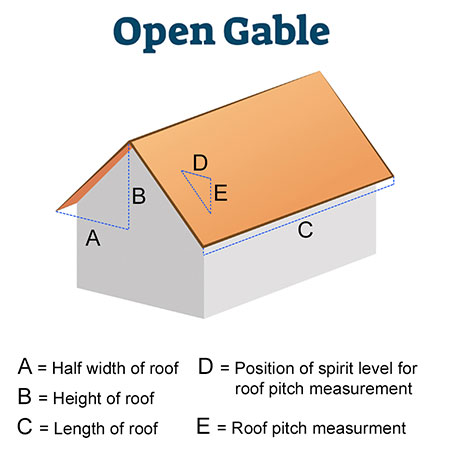
Now, you’re probably thinking, "wait, that only gives us the area of one side of the roof", and you would be right! However, for the purposes of measuring up for guttering on a gable (single) roof, that is all we need. Each side of the roof will have its own run of gutters, which will only need to manage the rainwater run-off for that effective catchment area.
If you have a hipped roof (all sides slope down to the walls of your house), this calculation won’t work and you will instead need to get the pitch measurement.
If you know the pitch of your gable roof, use the following calculation:
Calculation
Calculate the property’s Length x (Half Width + Pitch Multiplier) = Effective Roof Area (approx.)
Calculation Example
If we take the average size of a house in the UK of 76m2 (and make it a simple square for the sake of this example), and take the closest pitch multiplier from the chart for a 9/12 roof pitch, our calculation would look like this:
- Roof length (the longest edge) = 8.7m
- Half Roof Width = 4.35m (8.7/2)
- Pitch Multiplier = 1.250
- 8.7 x (4.35 + 1.250) = 48.7m2 effective roof area
Calculation Notes
You’ll see that this does give a different figure, and that is because by using the pitch of the roof, you’ve actually discovered that the height of your roof is 3.26m, not 3m as we guessed in the example above. In this case, it won't actually make too much difference in choosing the right gutter size, but the discrepancy caused by guessing the height could cause you problems if your eye is less accurate.
If you know the pitch of your hipped roof, use the following calculation:
Calculation
Calculate the property’s Length x Width x Pitch Multiplier = Effective Roof Area (approx.)
Calculation Example
If we take the average size of a house in the UK of 76m2 (and make it a simple square for the sake of this example), and take the closest pitch multiplier from the chart for a 9/12 roof pitch, our calculation for a hipped-style roof would look like this:
- Roof Length = 8.7m
- Roof Width = 8.7m
- Pitch Multiplier = 1.250
- 8.7 x 8.7 x 1.250 = 94.6m2 effective roof area
Calculation Notes
Because of the shape of a hipped roof, your gutters will need to run all the way around your property and deal with more rainwater run-off than from a gable roof. This is why you need to base your gutter size on the full effective area of the roof. You could use the same measurement for a gable roof, too, but since it only has two sides, the guttering you end up with could be a bit overkill.
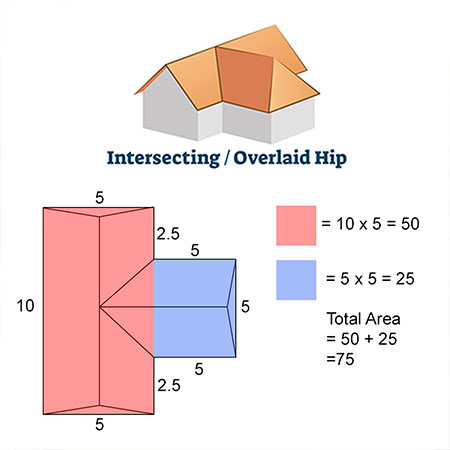
If you have an unusually shaped roof that doesn’t conform to either of these examples, you need to break up the sections into squares or rectangles that you can then calculate the areas for separately before adding them all together to get the total area, as demonstrated in the diagram of the intersecting/overlaid hip roof.
Armed now with an approximate effective roof area, you could move on to the final section of this guide, which discusses how to choose the most appropriate gutter size. However, if you really want to make sure you are getting the perfect system for your property, there is still the accurate measuring method to go review.
The Accurate Way - Measure your roof from up a ladder
Climbing up your ladders and actually measuring the full length and width of the roof with your tape measure (utilising the chalk technique if needed) is the best way to do the job right. Here’s how to do it:
To measure the drainage area of your roof, you need to:
- Carefully place your ladders at a safe angle up against the wall near the edge of the roof - make sure you have someone ready to hold the bottom to keep them secure. Then put your tape measure and chalk in your pockets and climb up.
- Measure the horizontal length of your roof from corner to corner. Stretch out the tape measure to one corner, take the measurement and mark the position with your chalk. Climb down the ladder, re-position past the chalk mark and repeat the process until you reach the opposite corner of the roof. Add all the measurements together to get your total length.
- Use the same technique to measure the width of your roof.
- If you have a gable roof, you can use these two measurements to calculate the effective area. If you have a hipped roof, you’ll need to repeat the process for every side of the roof to get an accurate measurement of the total drainage area of your roof.
This is essentially the same principle as described in Step 2 of Method 2, only this time you take it from the outside of the roof rather than the inside. To measure the pitch (the angle) of your roof, grab your spirit level and tape measure, then climb back up those ladders.
Note: Again, for the sake of making the lookup table easier to follow, we’ll take the pitch measurements in inches.
- After climbing up into your ladder, place one end of your spirit level up against the slope of your roof and find the level point.
- Using your tape measure, take a measurement from the 12-inch mark out from the roof down to where the tape meets the slope at a right angle. That measurement will give you the pitch, which is noted as being x/12, i.e. 9 inches down from the 12-inch mark would be recorded as 9/12.
- Use the following roof pitch conversion table to turn this into the required multiplier for our calculations.
| Pitch | Angle (degrees) | Multiplier | Pitch | Angle (degrees) | Multiplier |
|---|---|---|---|---|---|
| 1/12 | 4.8 | 1.003 | 10/12 | 39.8 | 1.302 |
| 2/12 | 9.5 | 1.014 | 11/12 | 42.5 | 1.357 |
| 3/12 | 14 | 1.031 | 12/12 | 45 | 1.414 |
| 4/12 | 18.4 | 1.054 | 13/12 | 47.3 | 1.474 |
| 5/12 | 22.6 | 1.083 | 14/12 | 49.4 | 1.537 |
| 6/12 | 26.6 | 1.118 | 15/12 | 51.3 | 1.601 |
| 7/12 | 30.3 | 1.158 | 16/12 | 53.1 | 1.667 |
| 8/12 | 33.7 | 1.202 | 17/12 | 54.8 | 1.734 |
| 9/12 | 36.9 | 1.250 | 18/12 | 56.3 | 1.803 |
Note: If the pitch of your roof is greater than 18/12 we would recommend contacting us for help with your calculations as your guttering may need special consideration.
The calculations used in this step are the same as those in Method 2, only this time we have more accurate measurements to play with.
Using the same 76m2 example house, we’ve now discovered that there is 4.5cm overhang to the roof that the previous method wouldn't account for. Let’s see what that does to the calculations.
For a gable roof
Calculate the property’s Length x (Half Width + Pitch Multiplier) = Effective Roof Area
- Roof length (the longest edge) = 8.745m
- Half Roof Width = 4.373m (8.745/2)
- Pitch Multiplier = 1.250
- 8.745 x (4.373 + 1.250) = 49.2m2 effective roof area
For a hipped roof
- Calculate the property’s Length x Width x Pitch Multiplier = Effective Roof Area
- Roof Length (the longest edge) = 8.745m
- Roof Width = 8.745
- Pitch Multiplier = 1.250
- 8.745 x 8.745 x1.250 = 95.6m2 effective roof area
Note: When it comes to getting an accurate measurement for a property that is an unusual shape, or one that has multiple sections, we would highly recommend speaking to a professional to make sure it gets done right. It is possible to do it yourself by working out the effective area for each section of roof and then adding them together, but that could require you to physically climb up onto the roof and move around, which is not advisable unless you are an experienced roofer.
Now, you’re probably going to look at these figures, see there is only around 1m2 difference between those taken via the less accurate methods, and ask "why did I risk my neck going up that ladder for an extra 1m2?". The answer to that lies in the Gutter Flow Capacity.
Gutter Flow Capacity is based on a worst-case storm rainfall intensity, that would put down 0.021 litres of rain per second per metre square, as recommended by British Standards.
Calculating your effective roof area x rainfall intensity gives you a gutter flow capacity that can be crucial in finding the right size guttering, as you will see in the next section.
While it is true that this calculation can also be made using the measurements taken via the less accurate methods, and that our example figures don’t vary enough to have any great impact on your choice, in a real-world scenario, there could be a far bigger discrepancy between your best guess measurements and the true measurements of your roof. A difference of just 0.1 in gutter flow capacity could see you choosing a different-sized system than what you actually need. It’s up to you how much that level of accuracy matters to your project.
Once you are happy with the calculation you have, it’s time to choose the gutter size that best corresponds with the size of your roof.
Choosing the right gutter size for your roof
Knowing the effective area of your roof and the gutter flow capacity should enable you to go along to any guttering manufacturer or stockist and use their comparison charts to figure out what size guttering you need.
Here at JDP, we stock an extensive range of plastic guttering systems from Floplast, who supply the following comparison tables for their products.
Floplast Gutter Comparison Table
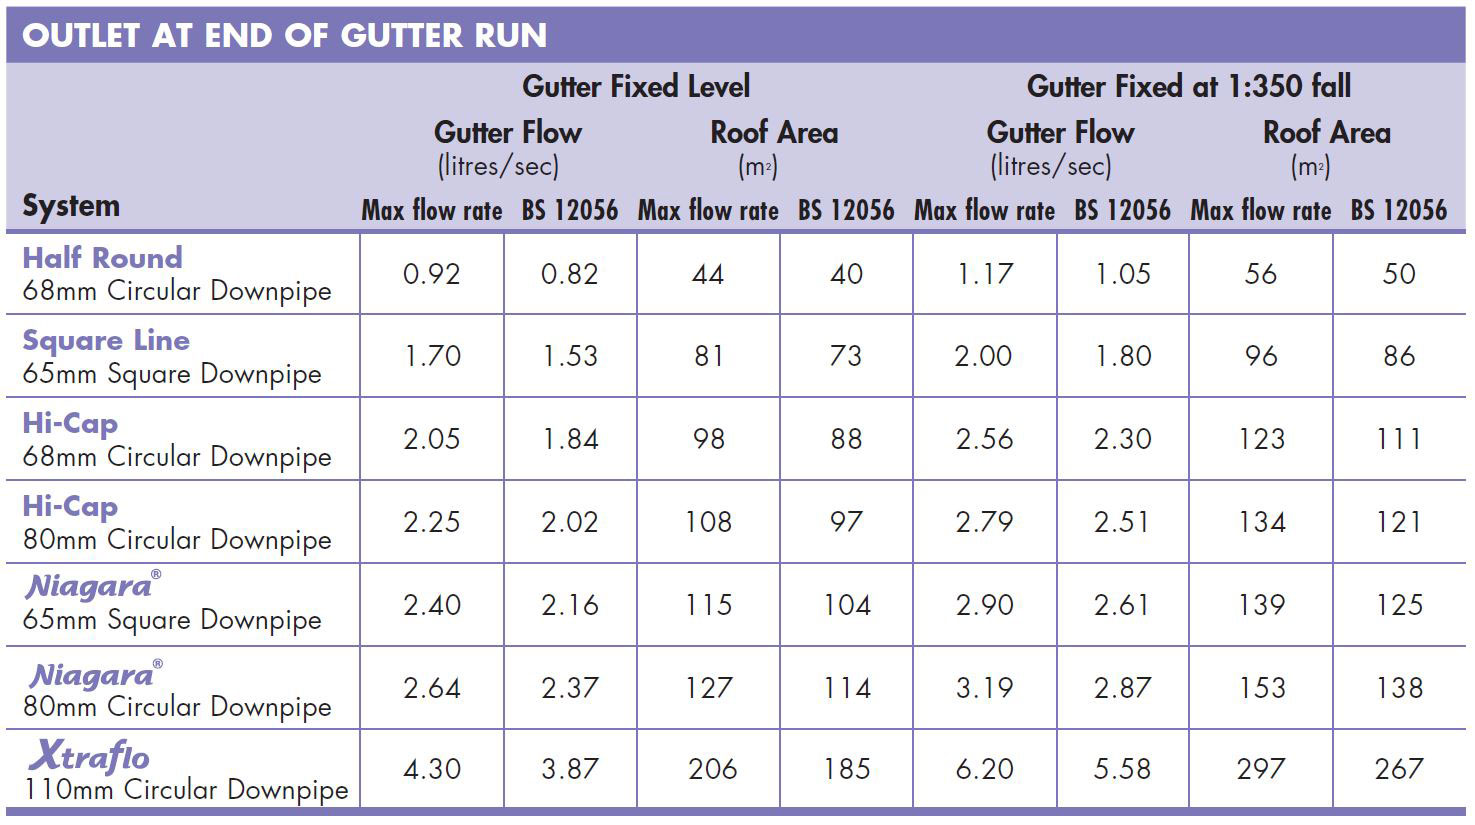
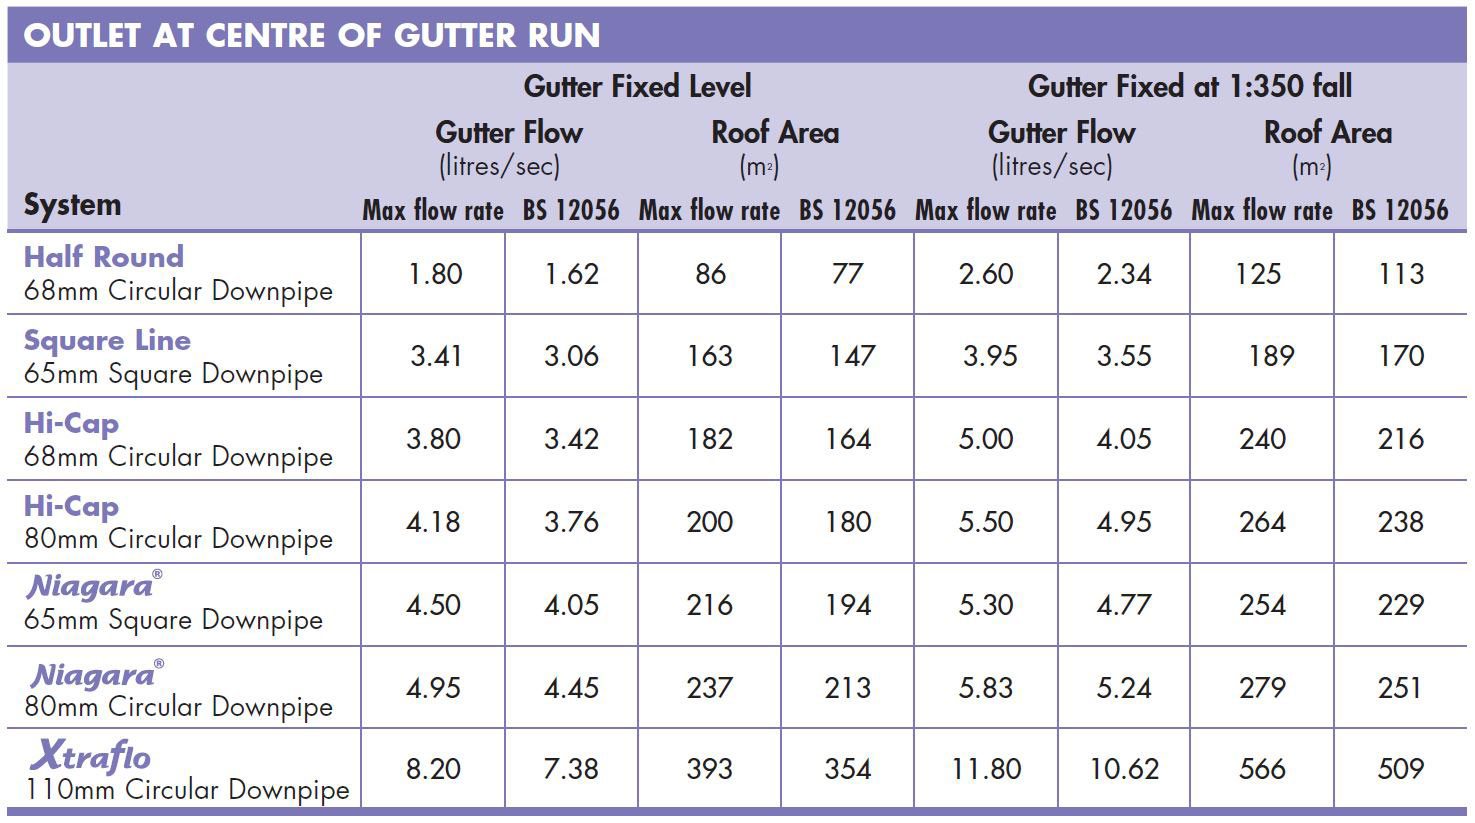
How to use the Floplast Gutter Comparison Table
As you can see, there are two tables shown here: one for "Outlet at end of gutter run" and one for "Outlet at centre of gutter run". While similar, they both have quite different figures in them. To avoid any confusion, let's break down what each one is showing.
The position of the outlet in your gutter run is important because it will dictate where your downpipe needs to be positioned, or vice versa. The position of your downpipe is important because it can impact the efficiency of the whole gutter system.
Installing your downpipe in the centre of your gutter run (using a running outlet) actually increases the gutter flow capacity and effective roof area that the system can handle. However, it also potentially means having a downpipe running more visibly down your wall rather than off to one side, which is unlikely to be ideal for gable-roofed properties.
There’s nothing wrong with having your outlet at the end of the run, though, so long as you choose the right system based on the gutter flow and roof area figures in the applicable table, but it is worth considering the centre run outlet if you need the larger capacity but don’t wish to buy a bigger-sized gutter.
The other thing you will notice in these tables is that there are options for "Gutter Fixed Level" and "Gutter Fixed at 1:350 fall". This is in reference to how you install your guttering.
If your gutters are perfectly level, they won’t channel the rainwater away as quickly as if you install them with a slight angle (fall) down towards the downpipe. While we would always recommend installing guttering with a fall (see our guttering installation guide for more on this), the information is there in these tables for you to work out the best system to use even if you choose not to.
Finally, the last thing to note about these tables is that there is a "Max flow rate" and "BS 12056" column for each data set. It may look confusing upon first glance, but there is, thankfully, a straightforward explanation for them.
The Max Flow Rate columns give you the figures for each gutter system's maximum capacity, while the BS 12056 columns show the figures for 90% of the gutter system’s maximum capacity. In accordance with BS EN 12056-3:2000, these figures are calculated as a safety factor.
So if, for example, we had an effective roof area of 55m2 and we were going to install our gutters with the recommended fall, we can see from the table that a Half Round gutter with a 68mm Circular Downpipe would be suitable if we only looked at the Max Flow Rate of 56m2.
However, under heavy storm situations, this guttering would be operating dangerously close to maximum capacity, making the chances of failing quite high. In this case, it would probably be worth investing in a larger guttering system or considering installing the downpipe at the centre of the gutter run to enable the system to cope with the higher capacity.
If we take the accurate calculations from our example house above, we can compare the following details against the charts:
Choosing a gutter for a gable roof
Effective Roof Area = 49.2m2
Gutter Flow Capacity = 1.03L/s
Here we can instantly see that the Half Round gutter would be no good to us if installed at a fixed level with the outlet at the end of the run, as our roof area and flow figures are above those in the table.
However, if we move over to the columns for installation with a fall, we can see that our figures would come in just under the BS EN 12056-3:2000 safety factor recommendations. This means that a Half Round gutter system, installed with a 1:350 fall, and a 68mm Circular Downpipe, installed at the end of the gutter run, would be perfect for our gable roof.
Choosing a gutter for a hipped roof
Effective Roof Area = 95.6m2
Gutter Flow Capacity = 2.01L/s
Here we can see that our options are a bit more limited. We have to move down to the Hi-Cap gutter, installed with a fall, and a 68mm Circular Downpipe, installed at the end of the run, before our figures safely match up with the BS EN 12056-3:2000 safety factor recommendations.
However, if we didn’t mind having the downpipe installed at the centre of the gutter run, we could go back to the Half Round gutter system, installed with a 1:350 fall, meaning that we could still choose the cheaper option if we wanted.
And that’s all there is to it. The tables may look complicated, but once you understand the layout of the information, they are an incredibly useful aid to give you as much choice over the guttering system you buy as possible. If you aren’t interested in plastic gutters though and want to shop around for some of the metal alternatives, worry not, the principles are just the same. Most manufacturers will offer similar comparison charts that allow you to match your calculations to the right sized gutter.
That’s how you go about choosing the right size guttering for your roof. Hopefully this wasn’t too complicated to follow, but if you have any questions or need any further advice about your rainwater guttering, contact JDP today. Our technical team is always on hand to help with all your drainage needs.